
Learn how to take night adventure photos
Hi there! As I promised in my last post, I am going to dive deeper into technical details and nuances of shooting night adventures photos, and aspects of post-processing. So, let’s talk about all these things, and I will give you some direction, tips & tricks and after reading you could do cool adventures photos.
Almost all night adventure photos have the Milky Way in the frame. And it makes sense. The Milky Way is the most magnificent thing on the skies and to have it on your picture will add significant emotions to the composition. But some cool night adventure pictures could be captured and without the Milky Way too.
There are 4 major steps in taking night adventure photos. The first one is preparation. The second one is scouting and composition. The third step is shooting. And the last one is post-processing.
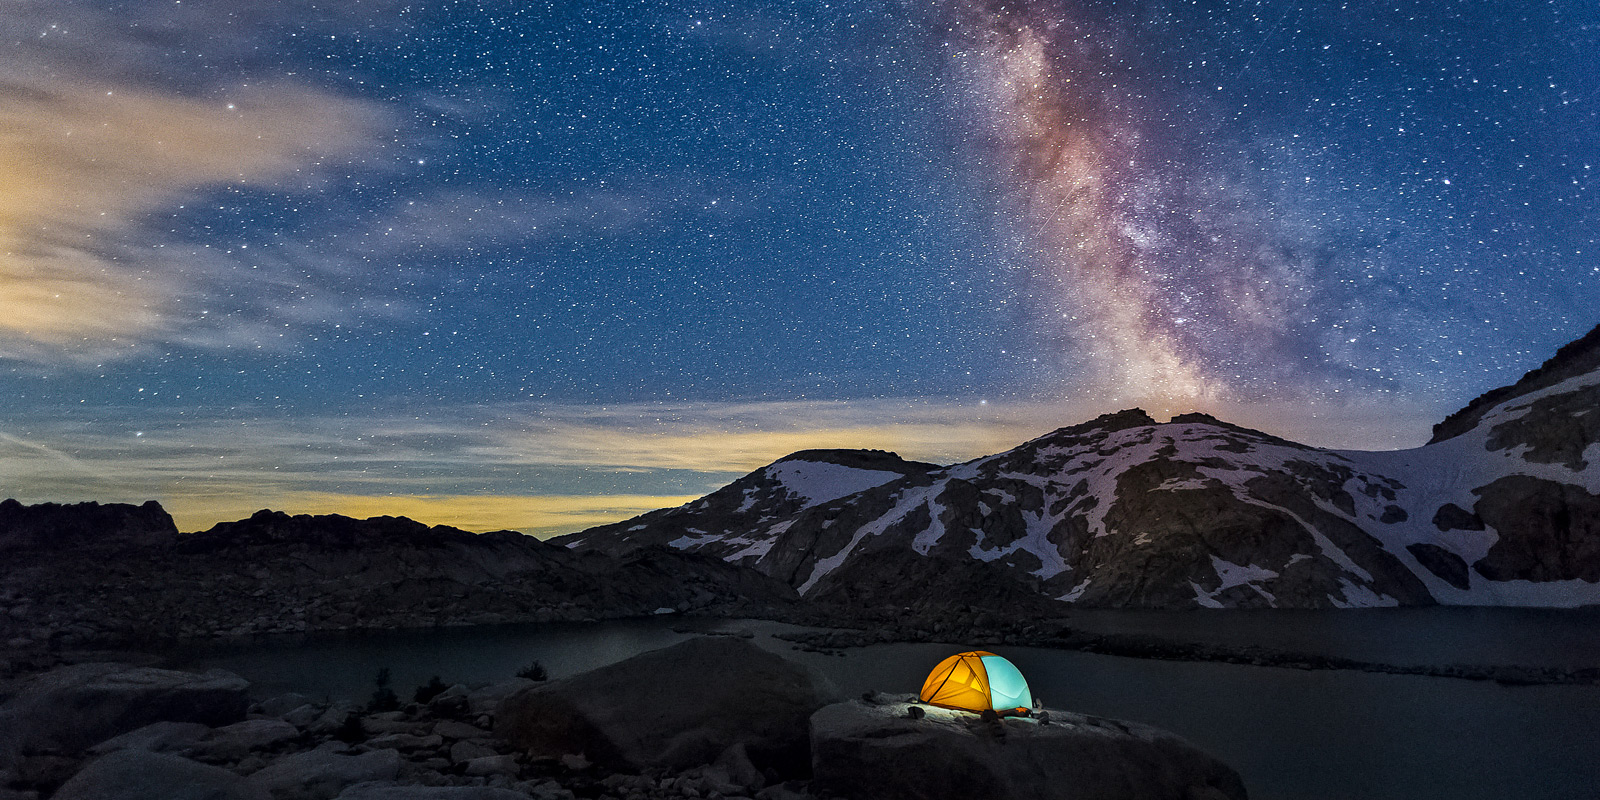
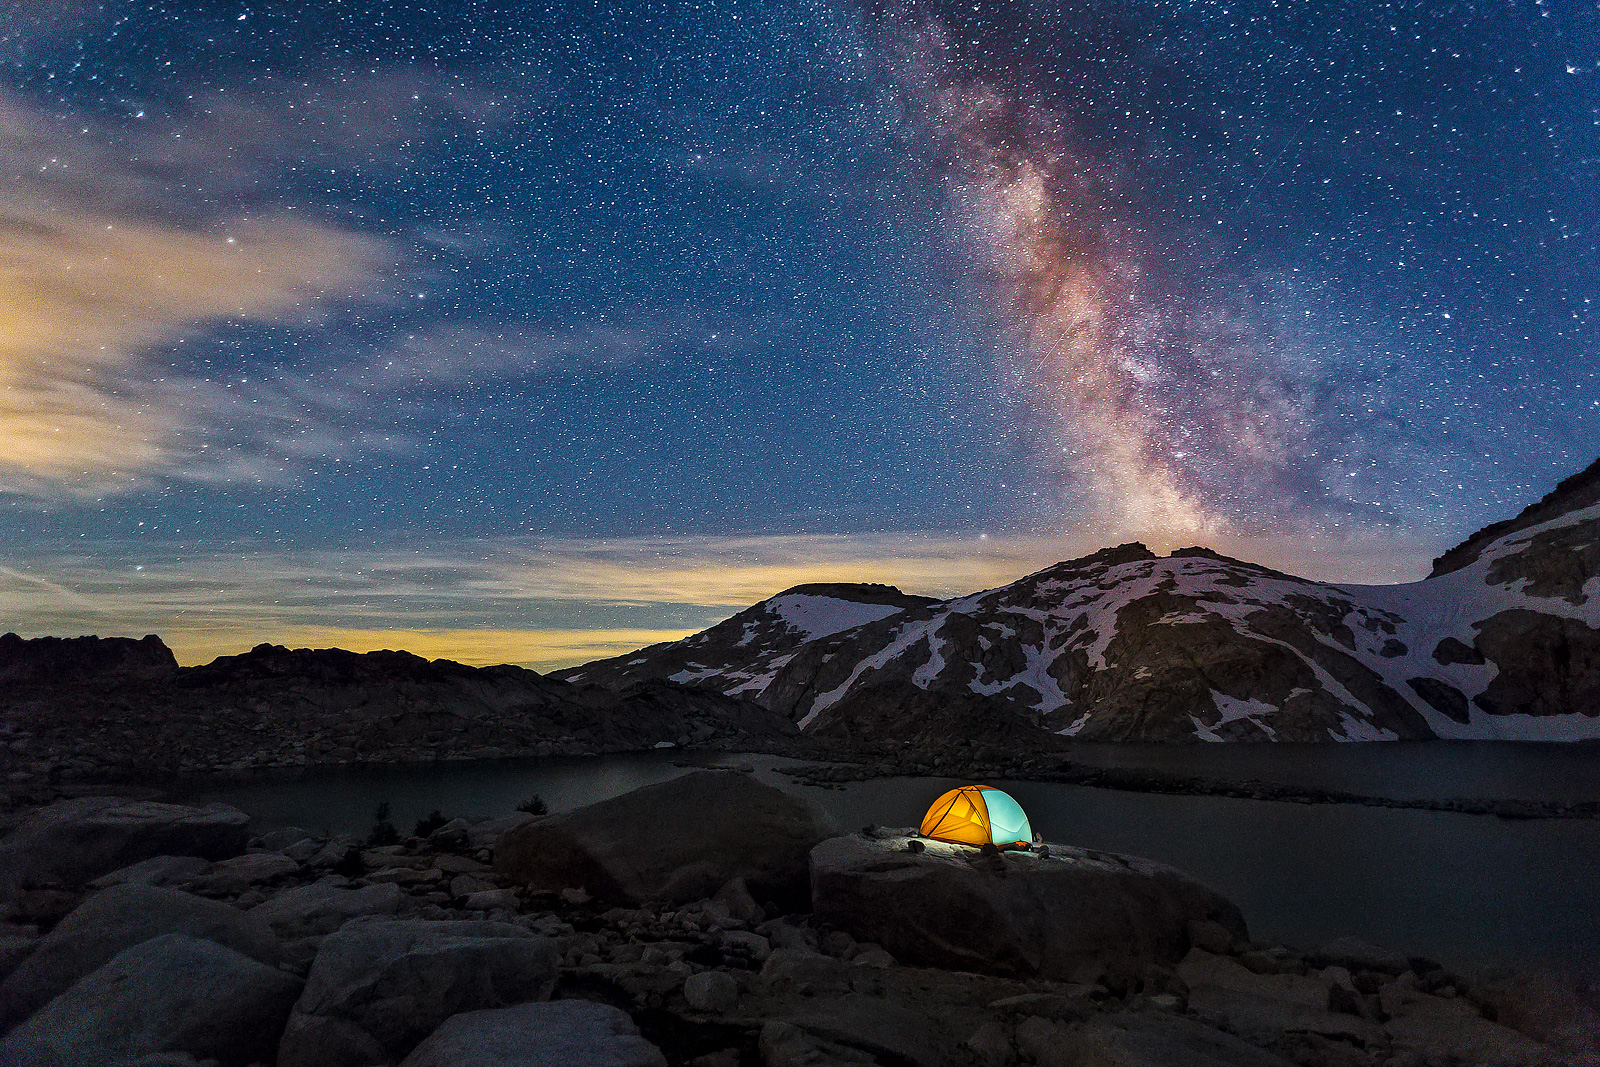
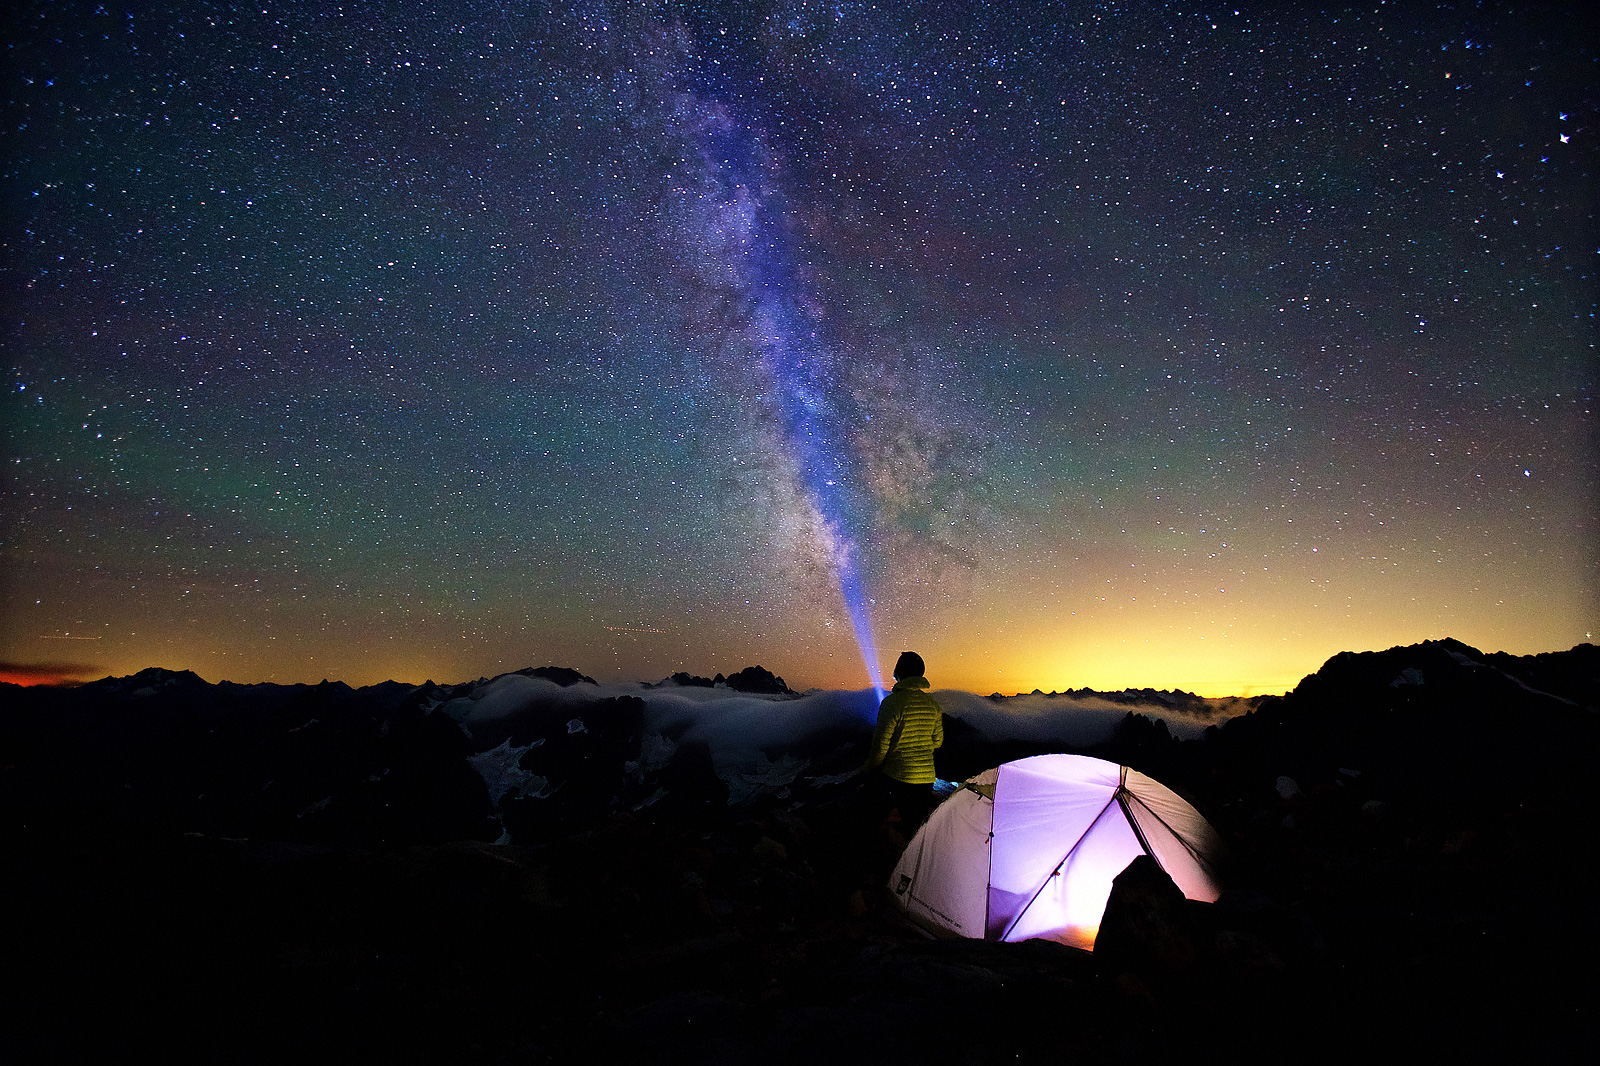
But before diving deep into all the details, let’s talk about the idea. I call this step the zero step. Usually, I don’t have a full picture in my head before I see a location, but sometimes I do. Like this shot. I had the idea of it a long time before getting it, and when I came to the location, I was looking for a specific place that was the best for my idea.

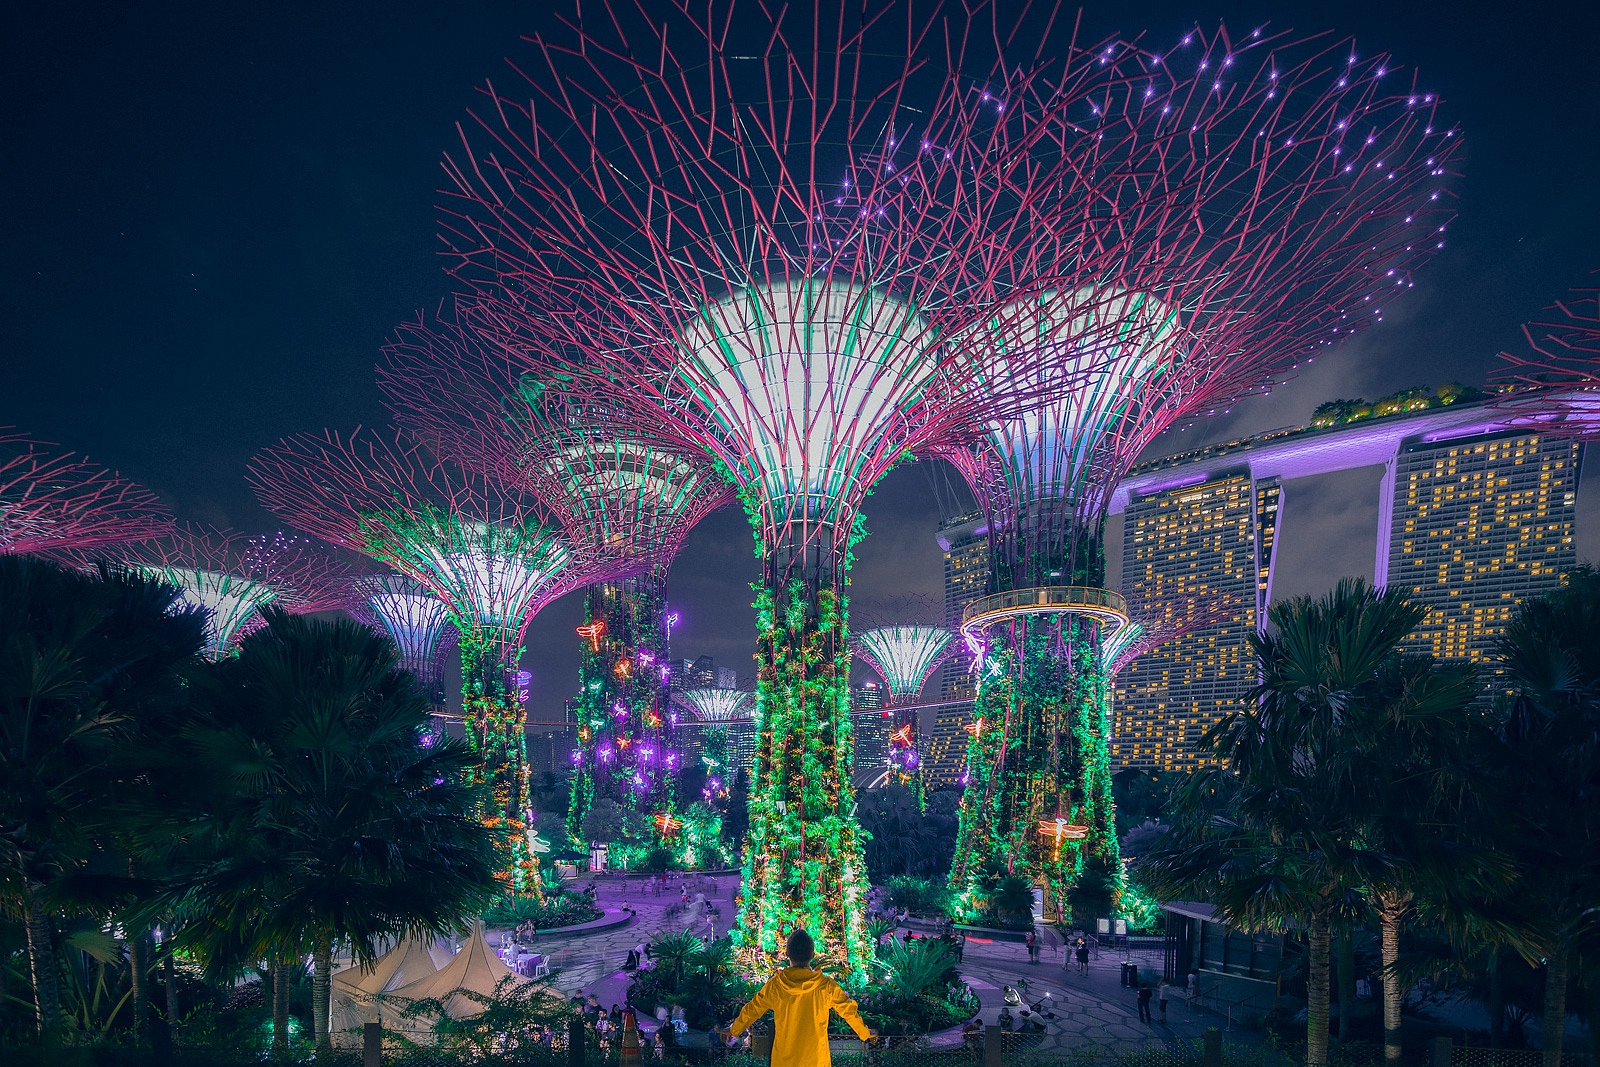
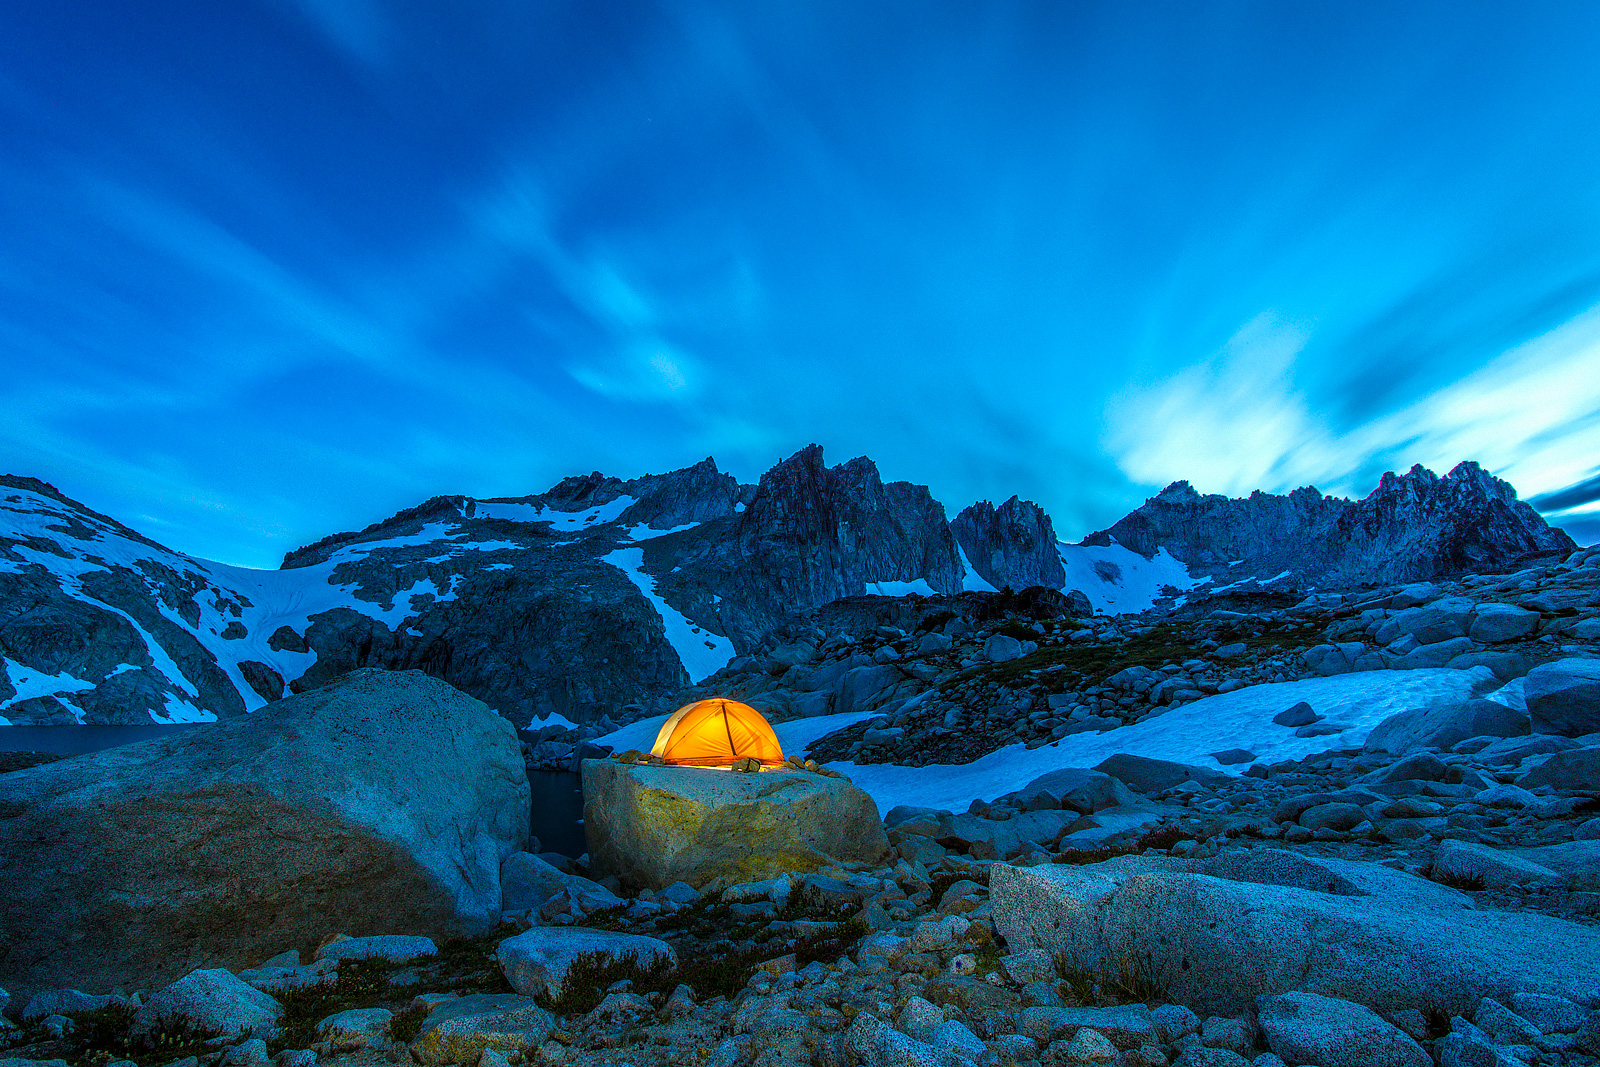
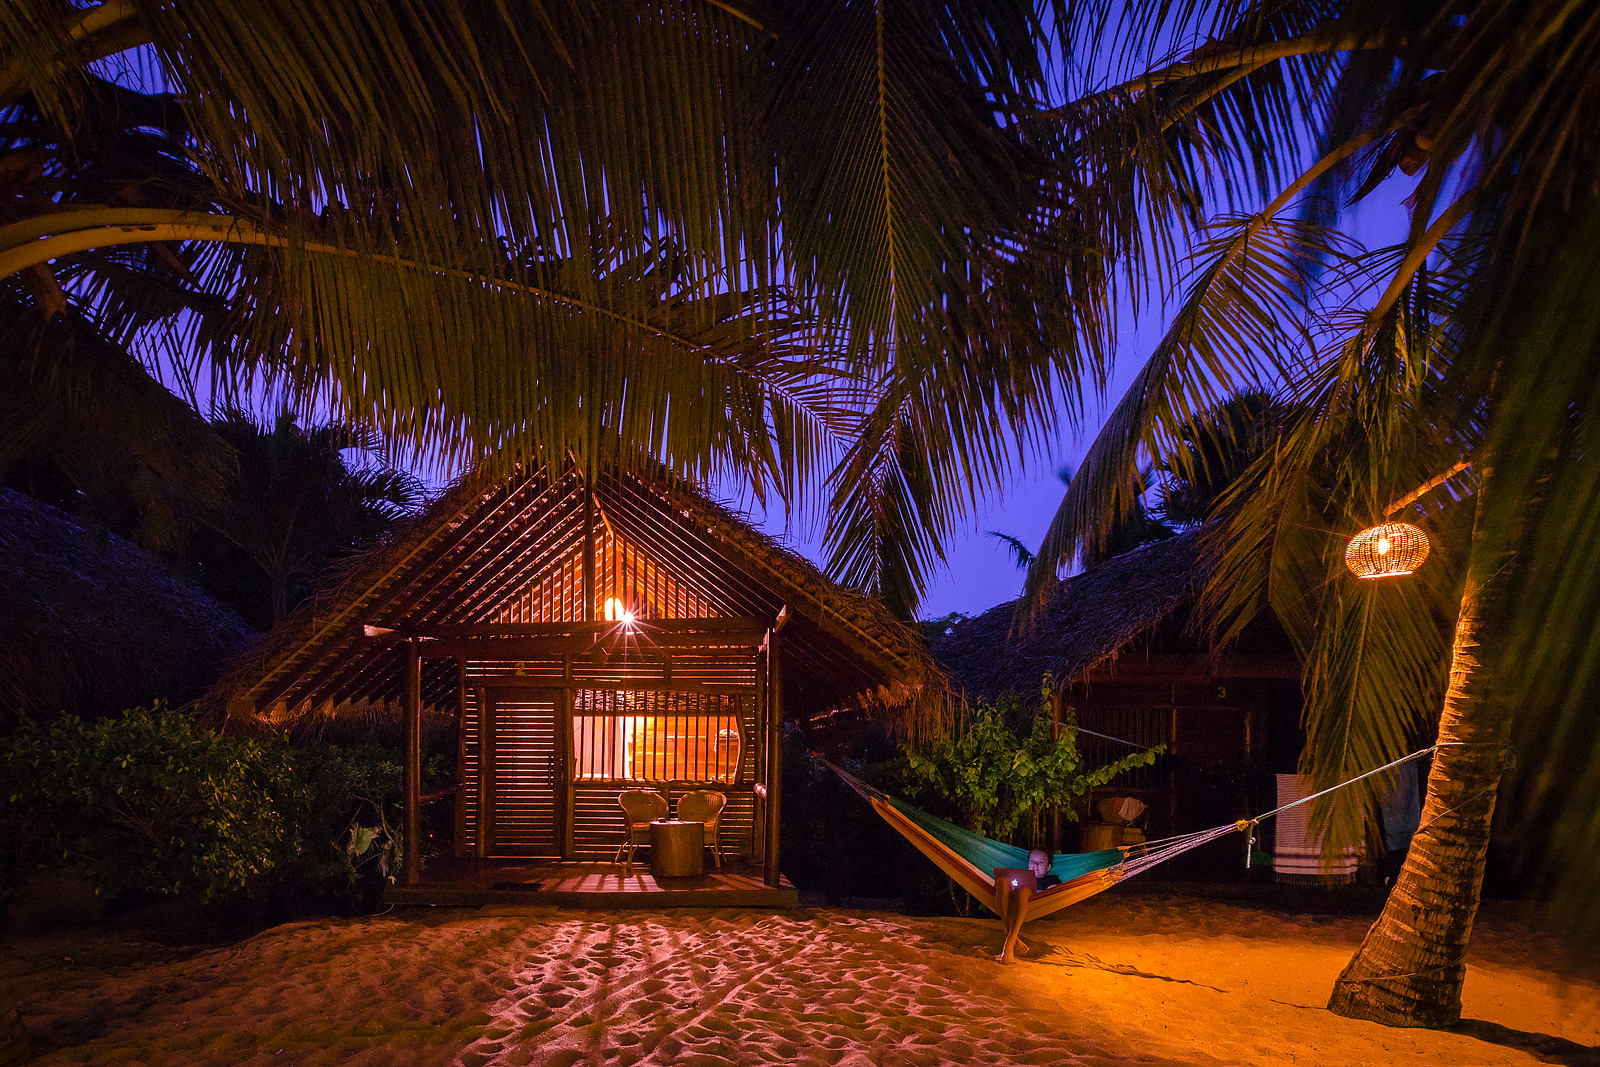
Usually, I have just a general idea that I’m going to achieve. Let’s say I want to take a tent under the stars or something like that. Sometimes the idea comes to me suddenly when I see a location. For example this shot, This photo is a real camping spot, and I did nothing for preparation, I just took this picture.

The good thing about having a general idea is training your imagination. It will help you to see a night picture when you look at a location during a day. Believe me; it requires some preparation of your vision.
Ok, let’s get started! As I mentioned above, there are 4 steps, and the first one is preparation.
1. Preparation
Here I am going to show you what I use for taking night adventure photos and what you should expect from the process. Here is a general equipment set.
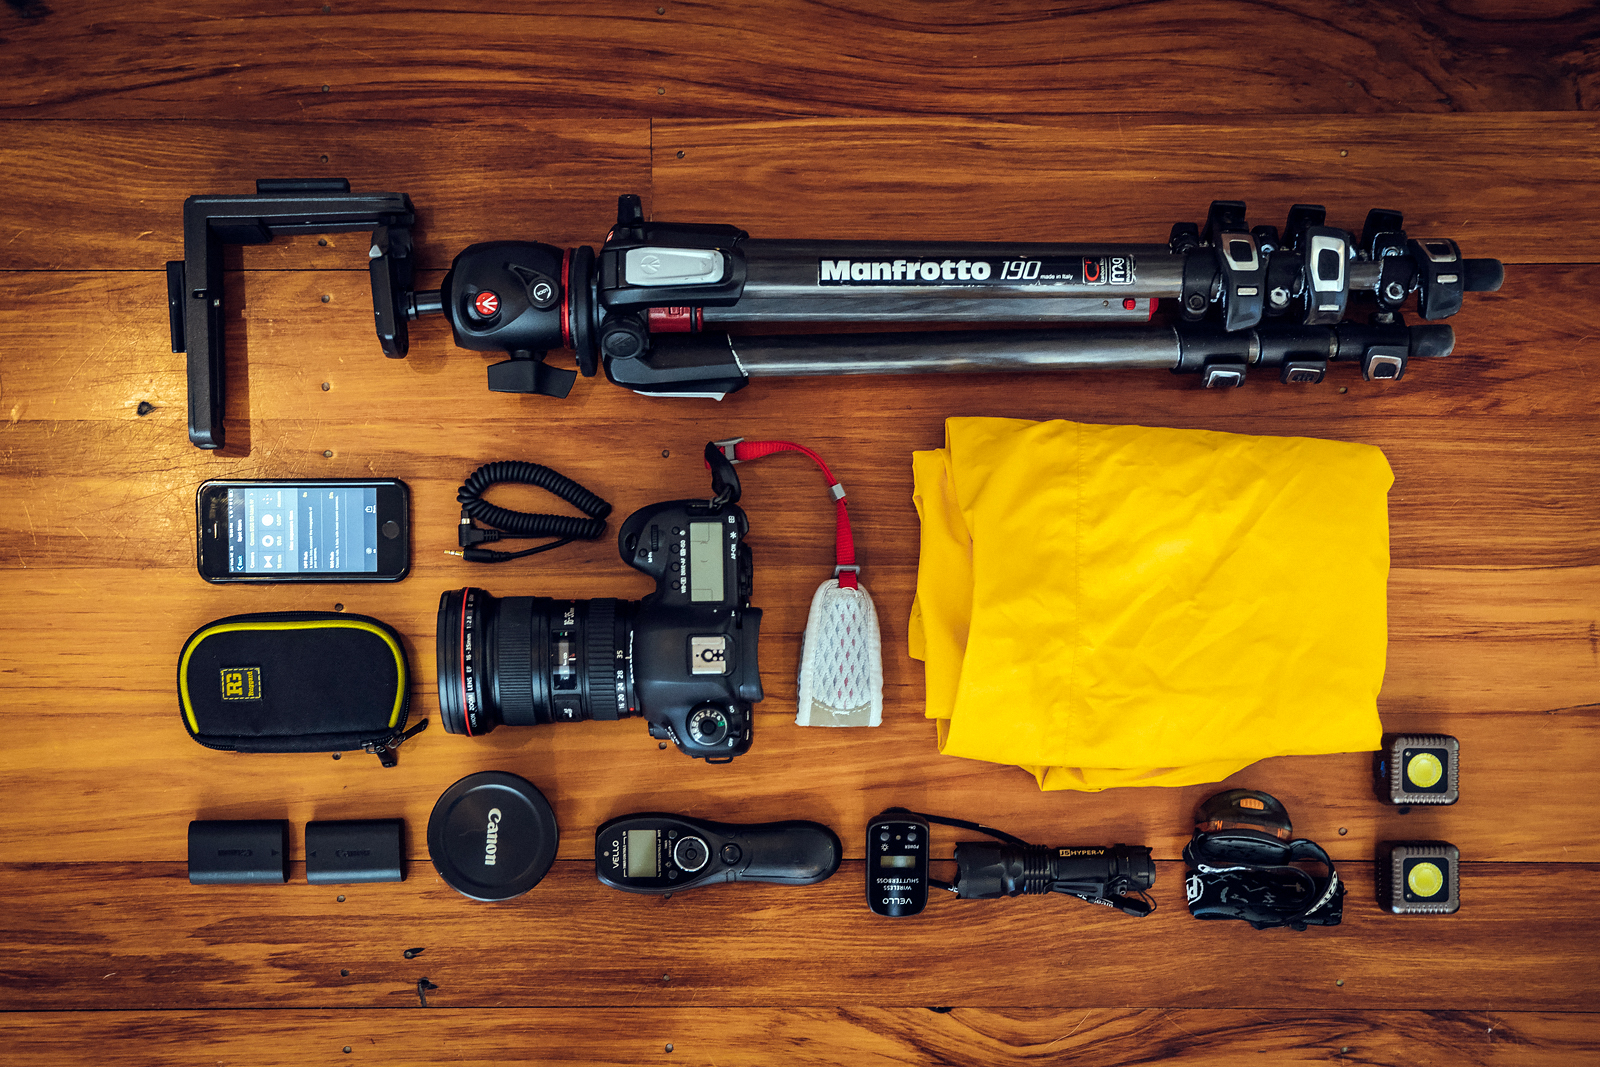
DSLR Camera
It’s quite an important thing here. As night scenes are dark, so you need a camera that works well with high ISO to 3200 or higher. Otherwise, your picture would be full of digital noise. I use Canon 5D Mark IV. I suggest using a full frame camera. If you use a crop camera, it’s ok, but expect to have fewer stars and the Milky Way on your pictures. And full frame cameras usually have better noise performance than cameras with crop sensors. Your camera has to have a manual mode where you can control exposure, aperture, shutter speed, and ISO. One more important thing about the camera is the ability to shoot in RAW. It’s quite a critical thing.
Lens
The lens should be wide. The wider lens you have, the more Milky Way will be visible in the photos. I suggest something under 24 mm and 2.8 aperture at least. I use Canon EF 16-35mm f/2.8L II USM and even Canon EF 15mm f/2.8 Fisheye. There is one more point about wide lenses. They allow setting longer exposure time without getting star trails. You can read about it a little bit more here.
Power
Take several batteries for your camera and flashlights. Cold temperature shortens battery power performance. And long exposure shots suck out the power pretty quickly too.
Tripod
Yes, this is a must-have thing. As the exposure should be around 20 secs, so you cannot just hold a camera in your hands. It could be any tripod that you can afford, but I suggest something stable and heavy enough. It would carry a camera with a lens, and some places could be windy, so try to use something well made and stable. Personally, I use Manfrotto MT190CXPRO3 carbon fiber tripod. It’s good enough for all my purposes.
Additional cards
Probably it’s obvious, but I would like to notice it. Having several additional cards is important. Night conditions are not usual conditions. So there are a little bit more chances to break or lose your card. Have extra cards and be prepared for anything.
Flashlights
You need a few of them. It’s definitely dark in the night, so you need at least one headlamp for yourself and a few for lighting up the scene. I use one flashlight for painting by light and bringing up some details, and two different flashlights for tents. For tents, you don’t need to have powerful flashlights, but they should give round light that fills out space in a tent. I will explain it a little bit later. Lately I bought Lume Cubes. It’s quite an exciting device as you can manage how much light it gives, you can control them over your smartphone and use them like a flash. It means you can set up, let say, 1/250 sec and it will give a short amount of light inside a tent.
Remote controls
If you are going to do self-portraits and to have yourself in the photo, so you definitely have to have a wireless remote control. Another case where you can use them is star trails. Otherwise, you don’t need them as for the Milky Way the normal exposure is 15-25 seconds.
Smartphone
I use a smartphone for two cases. The primary one is using the app that shows me where the Milky Way is going to be. Another case is managing my Lume Cubes. And sometimes I use my iPhone as a wireless remote control.
Equipment for photos
If you are going to use yourself as a part of photos, try to wear bright jackets. Use orange, yellow colors. They reflect the light and will be looking nice and bright on pictures. Don’t use dark and black colors. And I don’t suggest using red jackets too. They pretty hard for post-processing. I have orange tents and jackets, and they work so nice on my night photos, because give warm accent to mostly bluish images.
Other things
Before departing to the location, I suggest to check out the weather. If it’s going to be rainy, so there is no luck for you. If it shows partition clouds, there is a good chance to have clear skies or small clouds. Clouds sometimes add some dramatic effect to night photos, but usually, they look like dirty spots in the sky. So, I suggest avoid them and shoot clear skies.
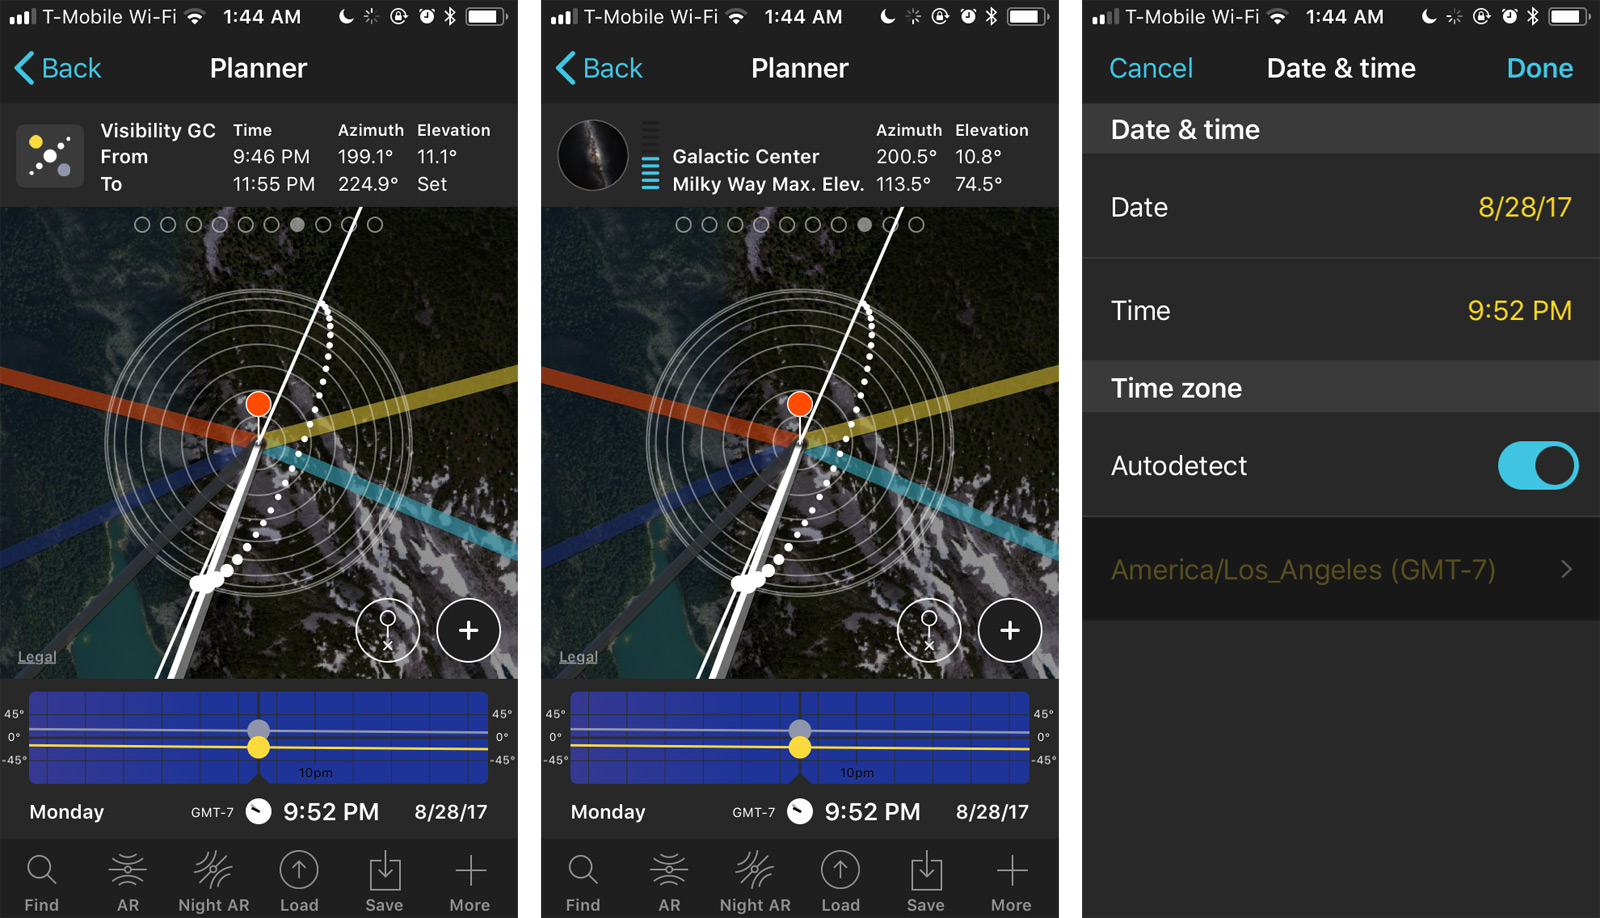
The second thing you have to check out where and what time you will see the galactic center. Yep, this fantastic bunch of bright stars in the Milky Way that you usually see on night photos is a center of our galactic. So to capture it, you need to know what time you will see it and where. Because sometimes it’s not visible at all and sometimes it’s visible almost the whole night. So to know it is critical. For understanding this information I usually use PhotoPills app. It could display all the information that you need and even show the Milky Way as an adjustable reality, that means you can see the Milky Way and the real picture at the same time. AR doesn’t make any sense for preparation but helps on locations.
Thinking about night photos always keep in mind light pollution. What does it mean? It means the location should be far away from big light sources such cities or something like that. So if your idea is to take a picture of the Milky Way above San Francisco, you will probably fail. I use this map for finding dark places.
The moon gives a lot of light as well. So if you are going to shoot during the full moon, I suggest don’t think about the Milky Way and think about other ideas. The ideal time for shooting the Milky Way, speaking of the moon, is during the new moon and the 4 days before and after it.
There are a lot of other nuances about the Milky Way at different places and different time of a year. Here you can find a lot of useful info about it. I will not describe it here, as this article is not just about shooting the Milky Way but about shooting night adventure photos.
The last thing that helps sometimes is googling for night photos from the place where you are going to head. It will give you some sense of the scene and what you can expect there. But be careful. A lot of photographers do composite night photos, that means they shoot several different images at the different time, and even at various places and combine them into one picture later in Photoshop. So if your goal is taking night photos as one shot, try to understand how some images were taken – as a single shot or as a composite one. Here I explain just “one-shot” technique because I don’t do any composite pictures.
So, you packed all your equipment, you know where and what you are going to shoot, you checked out the weather. Cool! Let’s discuss the second step – scouting and composition.
2. Scouting and composition
The significant part of night adventure photos is planning of the composition. Night photos mean you take them in the dark, where you see almost nothing. Usually, I explore locations during a day and try to imagine how it would look like in the night. If I am going to capture the Milky Way, I use PhotoPills and its night AR mode that allows me to see the Milky Way as a part of the scene. I can set time and see where exactly it would be in the night.
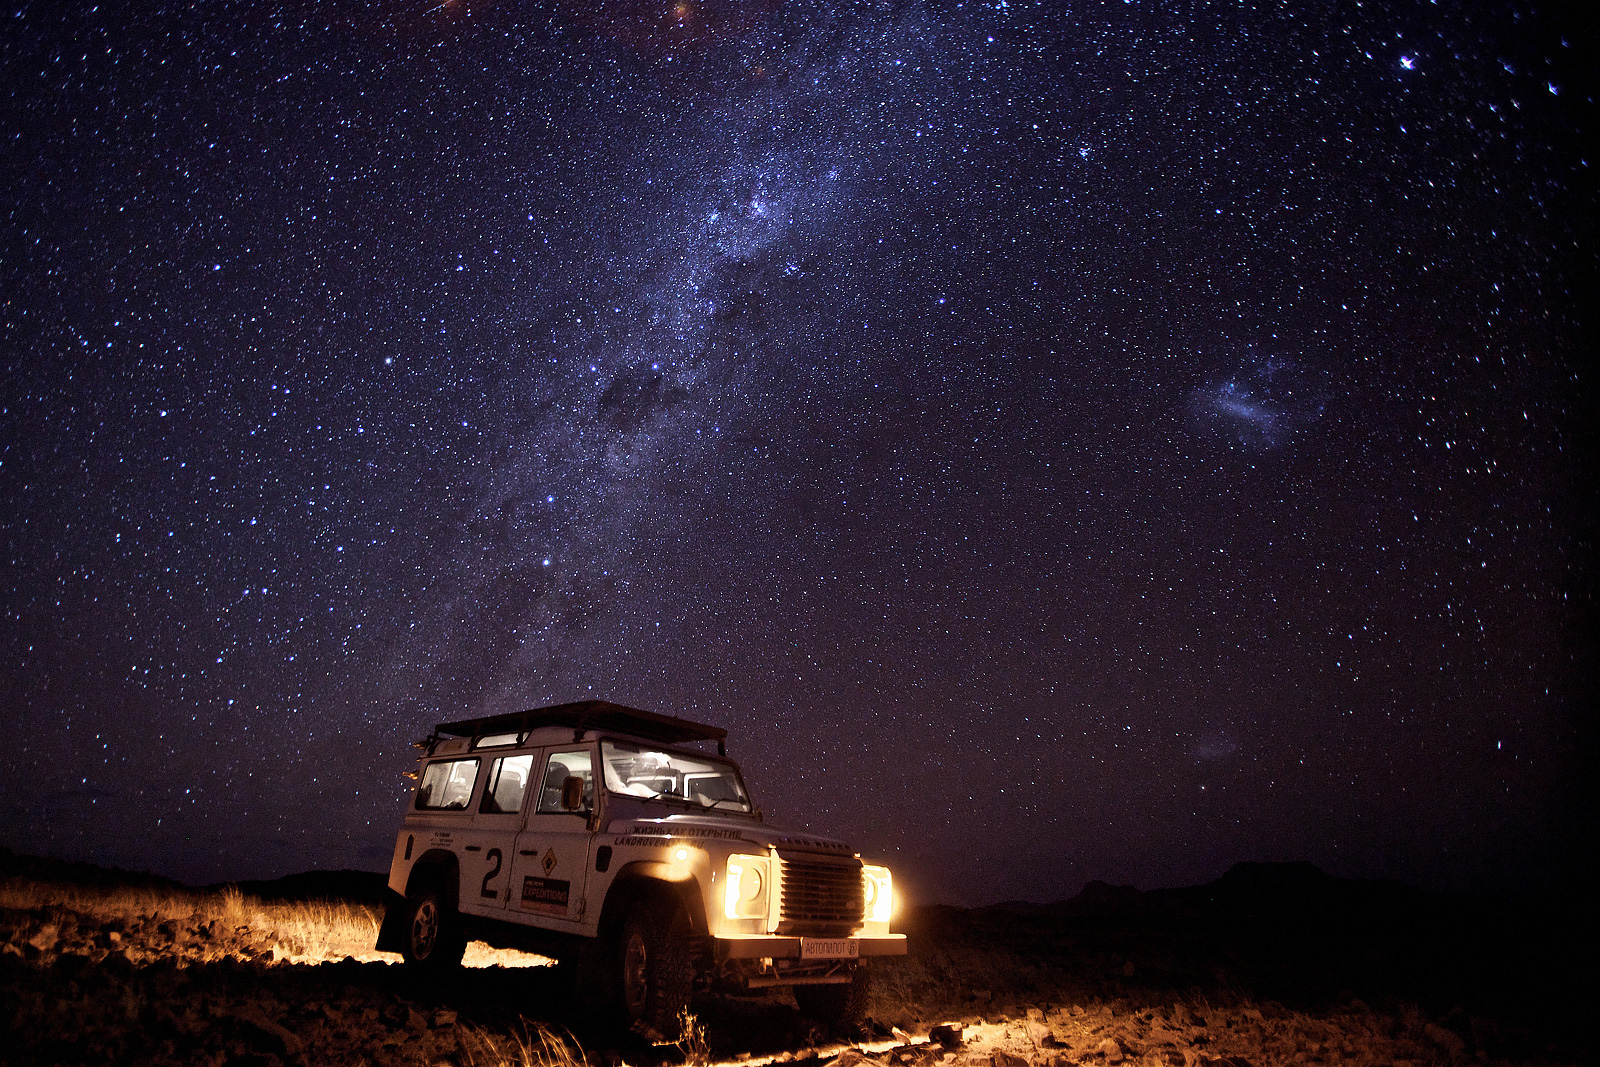
Besides a background where the stars and the Milky Way will be playing the major role, you should think about a foreground and the primary object of your night adventure photo. What are you going to use for that? There are a lot of cool things such tents, SUVs, bonfires, boulders, people. Just remember that objects should be motionless or almost motionless.
Speaking of the composition, I suggest keeping a primary object of your photo small. There are 3 reasons for that. The first one is emotional. Keeping the primary object small allows to show the greatness of the skies and add some dramatic effect to your photos.
The second reason is practical. If the main object is not entirely stable, let’s say it’s a person and a tree or something like that, so keeping it small allows minimizing blurry details of the object.
The third reason is technical. Shooting night photos means you have to maximize depth of field and keep stars in focus. So, you should to focus on the hyperfocal distance and having some objects between the hyperfocal point, and your camera means they will be blurry. You can take a look at this video and learn this a little bit more, or just use my advice – put your lens focus on infinity and don’t have anything important less than 10 feet to your camera.
As you have found the right shooting spot and have come up with a few ideas, try to take several test pictures. Just imagine how it will be in the night, where the Milky Way and the primary object will be located. The idea of it to test out the general idea and don’t change it drastically during the night because you will have other things to do such as lighting up the major object and shooting of course.
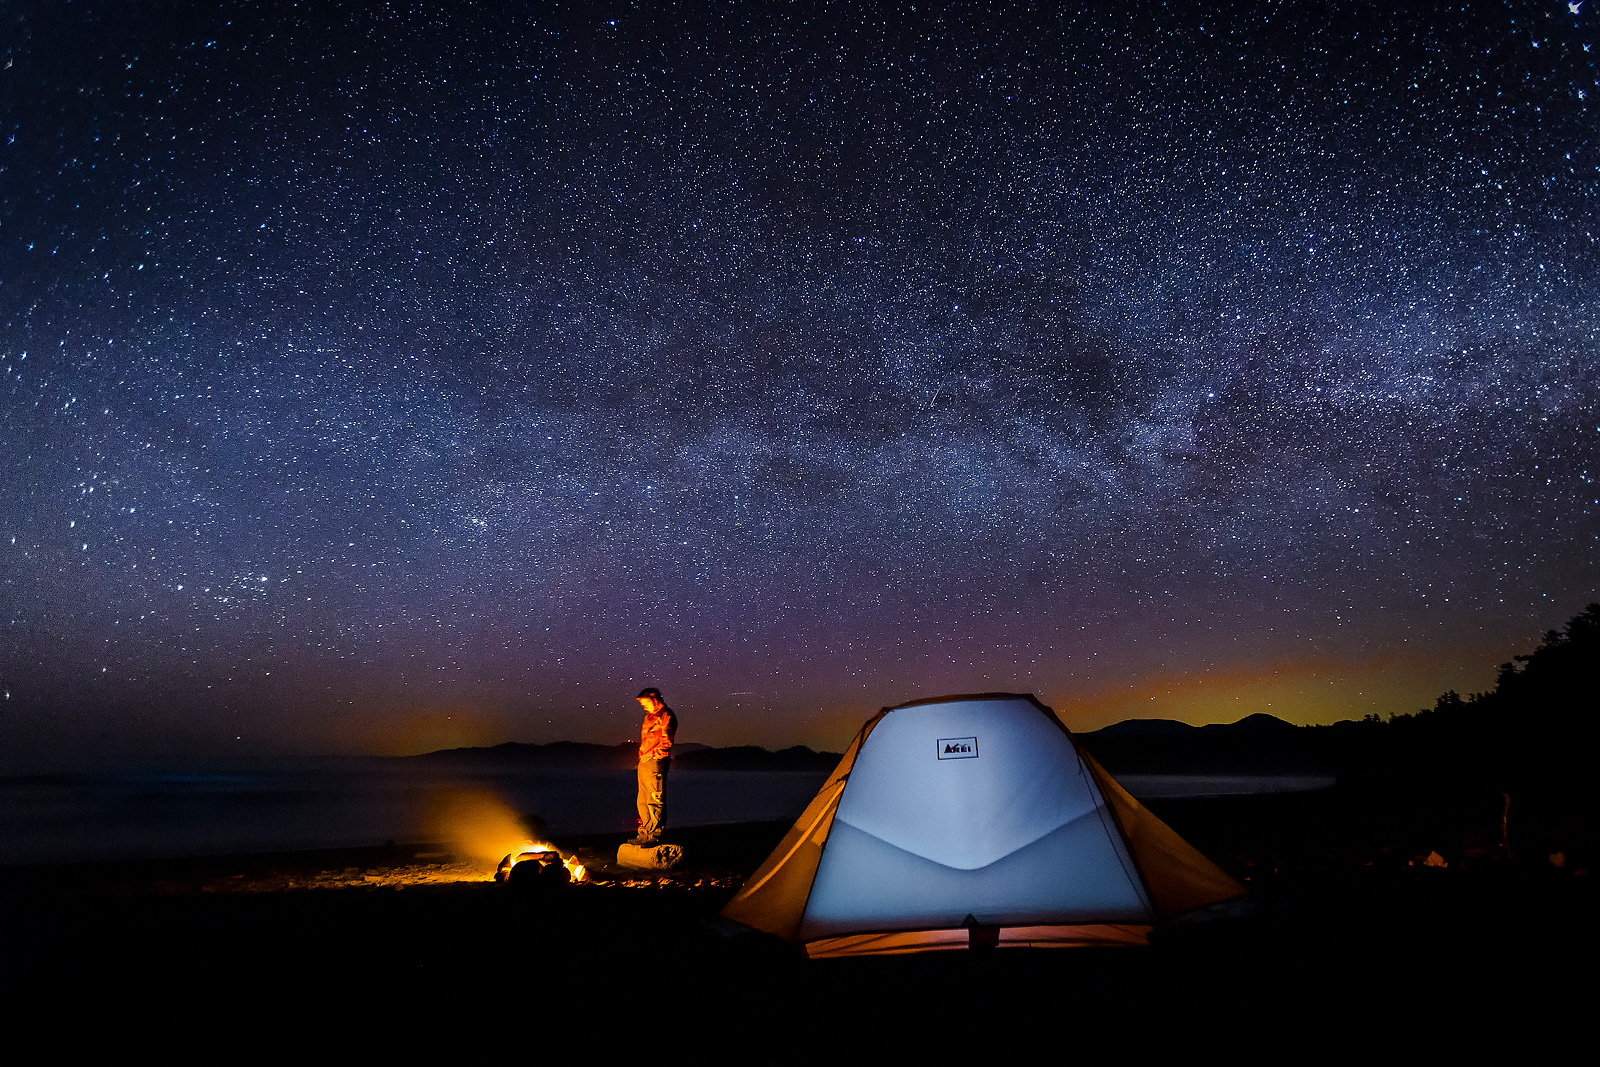
Sometimes during test shots, you can take cool adventures photos too. For example this image I got while I tested out the spot for the cover photo. Looks cool, right?
So, you know what a picture you want to take, you know where you should place your tripod with a camera, you know where and when the Milky Way will be on the skies. Cool. Let’s discuss the third step, and probably, the most interesting one – shooting.
3. Shooting
Shooting night adventure photos is not a quick process, it takes some time. I suggest expecting about 2 hours for the session. If you shoot the Milky Way, so come to the spot in an hour before time when you want to shoot your picture. It allows you to set up your camera and settings and to take a few test shots. Shooting a tent or any other objects that require illumination takes more time for preparation.
If you are going to use a tent as a primary object, I strongly suggest to set up your tent before the night. If it’s not possible, so add some time for that as well.
Let’s start with the camera. There are a few things you have to do for proper night shooting.
- Turn on the manual mode.
- Be sure you set RAW recording mode.
- Disable lens stabilization if your lens has it. You have to avoid any camera moves, and a stabilization motor can create some of them.
- Set up the focus at the hyperfocal distance or to infinity point And after that turn off autofocus.
- Set up the LCD screen brightness to its minimum. If the brightness is high, you will see bright stars on your LCD screen, but when you take a look at the photo later on a laptop or even on a camera’s LCD screen, you will see almost nothing, because on a bright screen in the night you can see dim stars what wouldn’t be visible good enough in the day time. So you have to have a realistic picture.
- Recreate your composition that you came up earlier.
- Open the lens’s aperture to its maximum 2.8 or less. You need to get as much light on the sensor as it is possible.
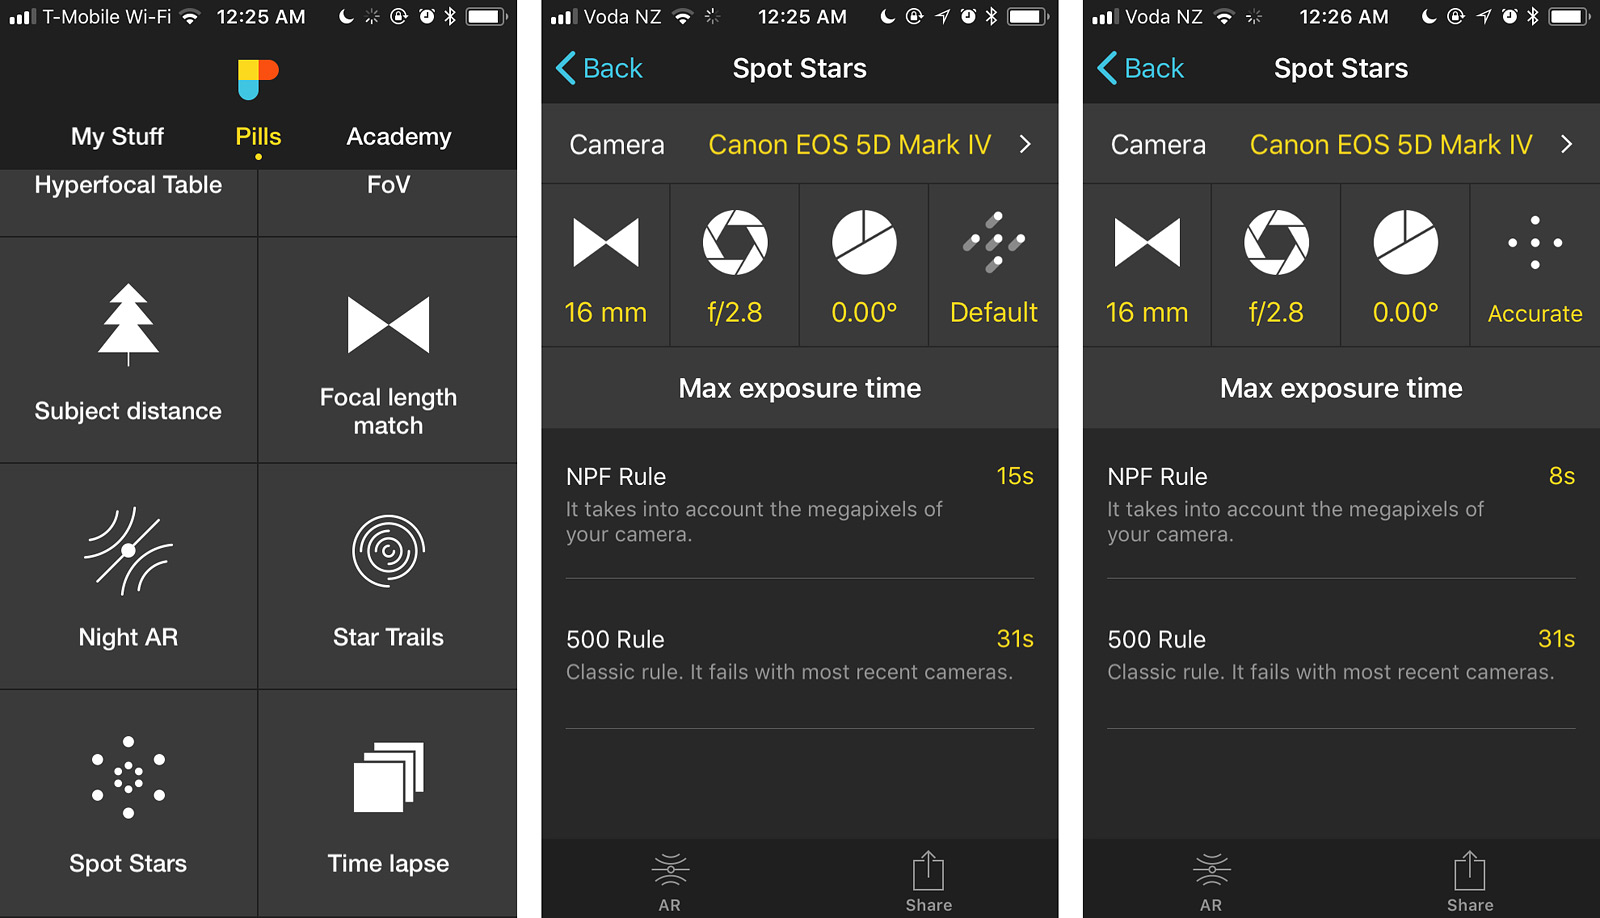
- Set up exposure to numbers with you can keep stars sharp. You can use PhotoPills for that.
- Remove any filters from your lens, even a protector or UV filter.
The first thing you need to do after that is to set ISO for getting the Milky Way or stars. You can change the tent illumination, you can control how much light you use for lighting up objects, but you cannot change brightness of stars. And you have 3 parameters that affect to the quantity of light that the sensor gets. These are ISO, exposure time, and aperture. You should keep aperture as wide as it possible, exposure time shouldn’t be less than PhotoPills shows you and the only ISO you can variate.
So, let’s say you use aperture 2.8, the focus distance is 16mm, and PhotoPills says your maximum exposure time is 16 seconds. It’s ok to make it a little bit longer. I use 20 seconds for my Canon EF 16-35. And now you need to set up ISO. It’s quite a tricky balance between digital noise and brightness of the stars and the Milky Way. The higher ISO you can set up the brighter skies you will get, but the noisier picture would be. That’s why noise performance is an important parameter for cameras. I suggest to set up ISO to 3200 and take a shot. Take a look at your screen. I bet you will see the Milky Way. If your lens has aperture wider than 2.8, so you can keep ISO lower. Anyway, you need to know how your camera performs with low light and digital noise.
As soon as you set up all the settings and took test shots and you are sure that Milky Way and skies look fine on it, you need to work on illumination of the primary object. There are 2 ways to do it. The first one is constant light and the second one is variable. Let’s talk about the first one as the only this one works for tents, and usually this one takes more time for setting up and brings up a lot of questions.
Put a small flashlight in your tent. Try to keep the tent empty or all stuff should be on the floor. Otherwise, you will get a lot of shadows. I suggest putting a flashlight on the floor. Illuminating a tent from a floor allows light fill out all space. If a flashlight is on a tent’s roof, you will get an overexposed bright spot on the top.
You would surprise how low light you need for that! The common mistake in the night adventure photos is overexposed tents. Just put a small flashlight in your tent and take a test shot. Take a look that you get. If it’s overexposed, cover a flashlight with a white t-shirt and something like that. It should not hide a light totally, just reduce it. Take another shot. The idea is to set up the light that illuminates a tent properly. Don’t overexposure it and do not underexposure it too. Or try to use Lume Cubes in a flash mode. You can adjust an amount of light pretty precisely. And if you want to change brightness, so you just need to use your smartphone without going to the tent. Pretty cool! As I mentioned before, I suggest using orange tents. They give warm and cozy colors on night photos. On this shot, you can see the difference between white and orange tent walls.
If you are going to use other objects that need to be illuminated you should use the variable method. Take a flashlight in your hand and point it to the up, start shooting, turn the flashlight on and quickly point it to the scene. It’s like painting by light. There is no any recommendation how long you should do it. It depends on your idea, how many lumens the flashlight has and how much light around you. It’s pure improvisation. Try it, capture it, take a look at the image, repeat. I suggest to use zoom and see all the details of the picture. Is it sharp enough? Maybe objects moved and now they are blurry?
After your first time of taking night adventure pictures you will quickly figure out why you should be prepared, why you should explore the location during a day, why it requires so much time. But it’s total fun, I swear! And pictures are awesome and unique.
Probably after your first time, or even after your second and third times, you will not get good pictures. It’s ok. Don’t give up. It just takes some time for practice. Enjoy the process, and the result will come sooner or later.
4. Post-processing
All these 3 steps that I wrote down above are really important for cool night adventure photos. But this last one is crucial! Usually, night photos require a lot of post-processing. Why? So, conditions are not perfect. Low light, high digital noise, under and overexposed spots.
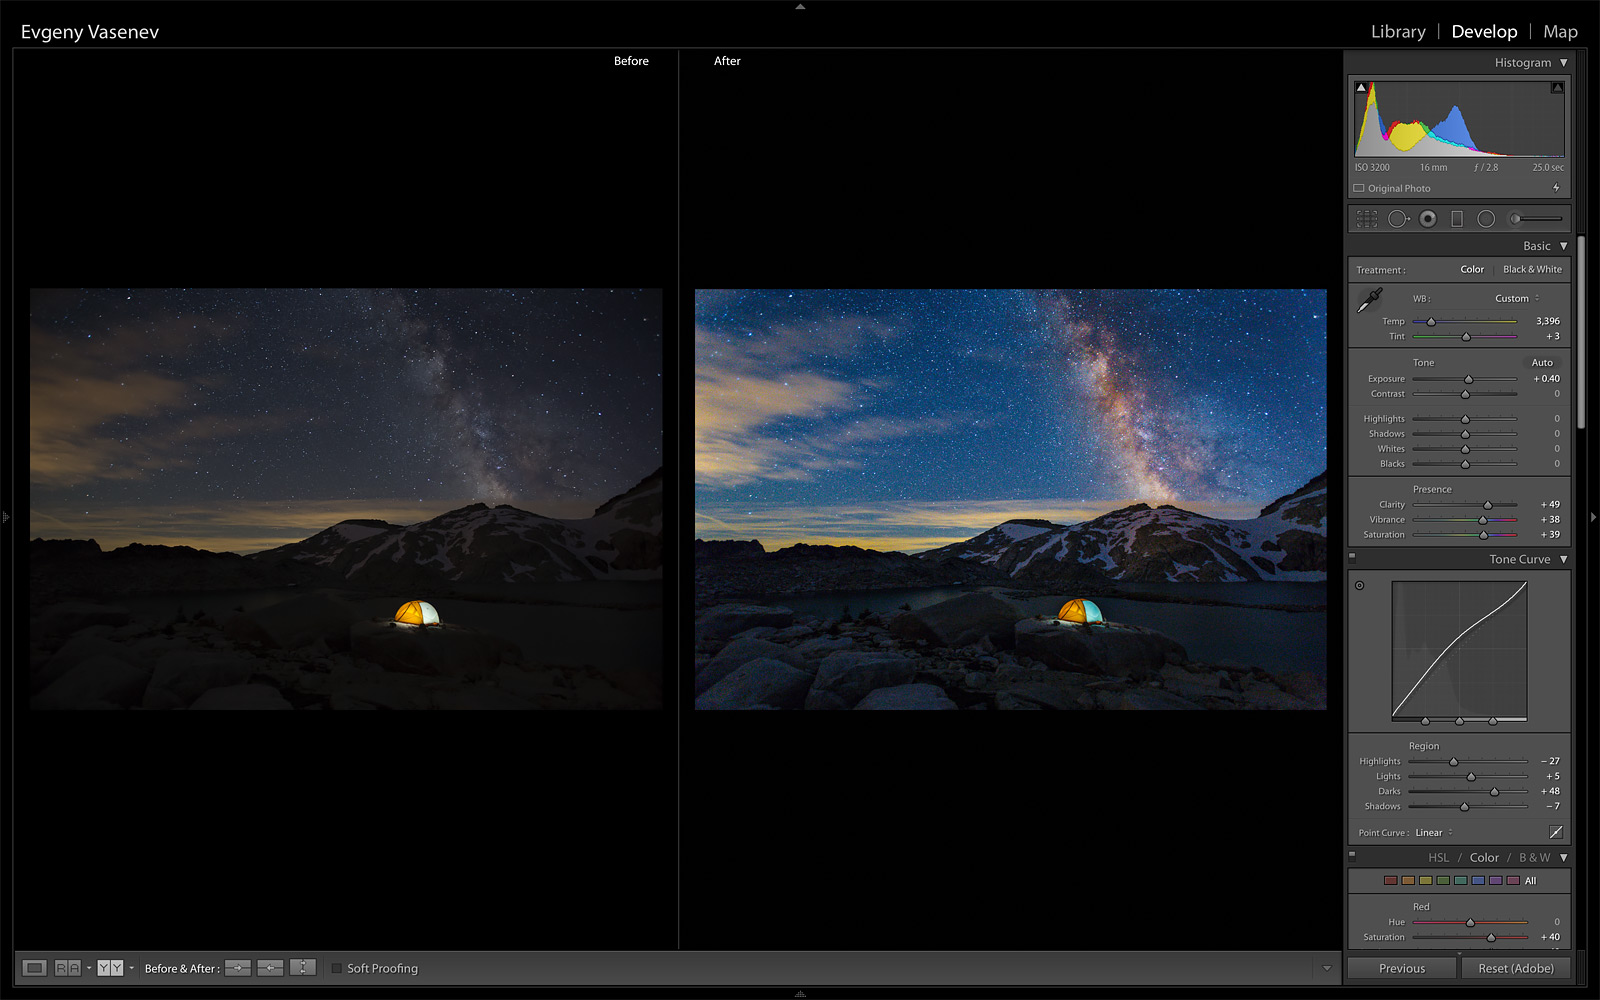
My post-processing method is improvisation; I just keep in my mind that I want to get and do it. So I will describe my general steps, but if you’re going to dive deeper into the post-processing of night photos, I suggest watching this tutorial.
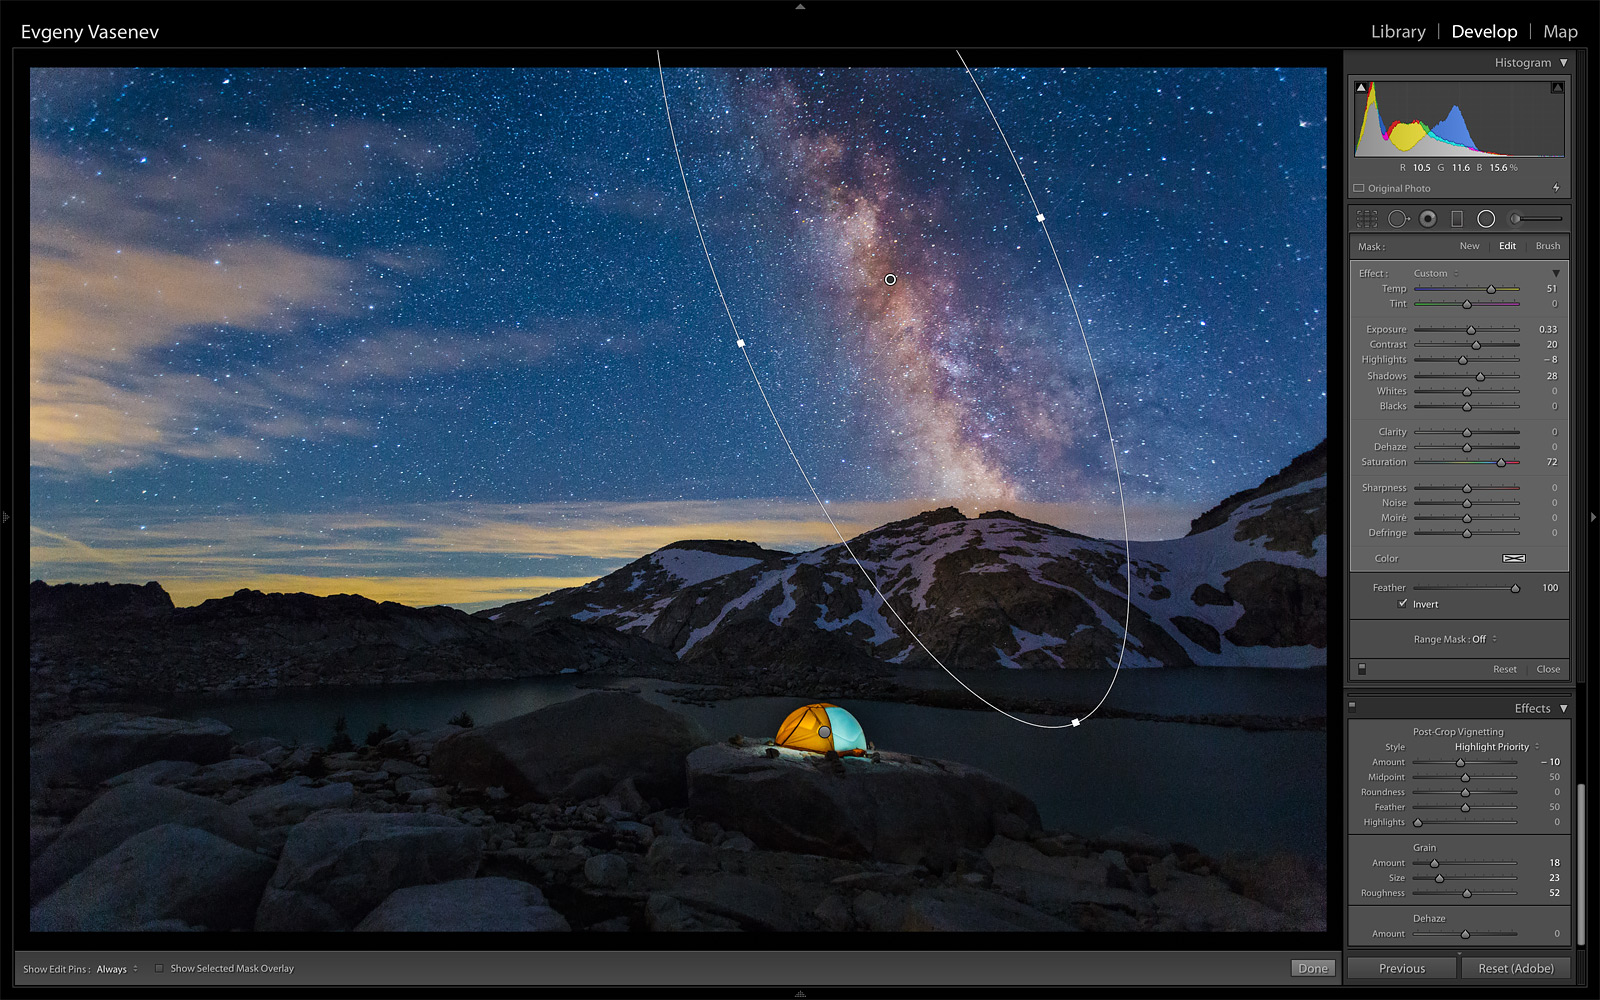
So, the first thing that I usually do is the color temperature. I see all my night pictures a little bit bluish, and I don’t like magenta skies. So I set the temperature a little bit lower that photos have in the beginning.


The second thing is tone correction. I adjust exposure, shadows, and highlights. I am trying to bring up some details and to make the whole picture is brighter as it is.
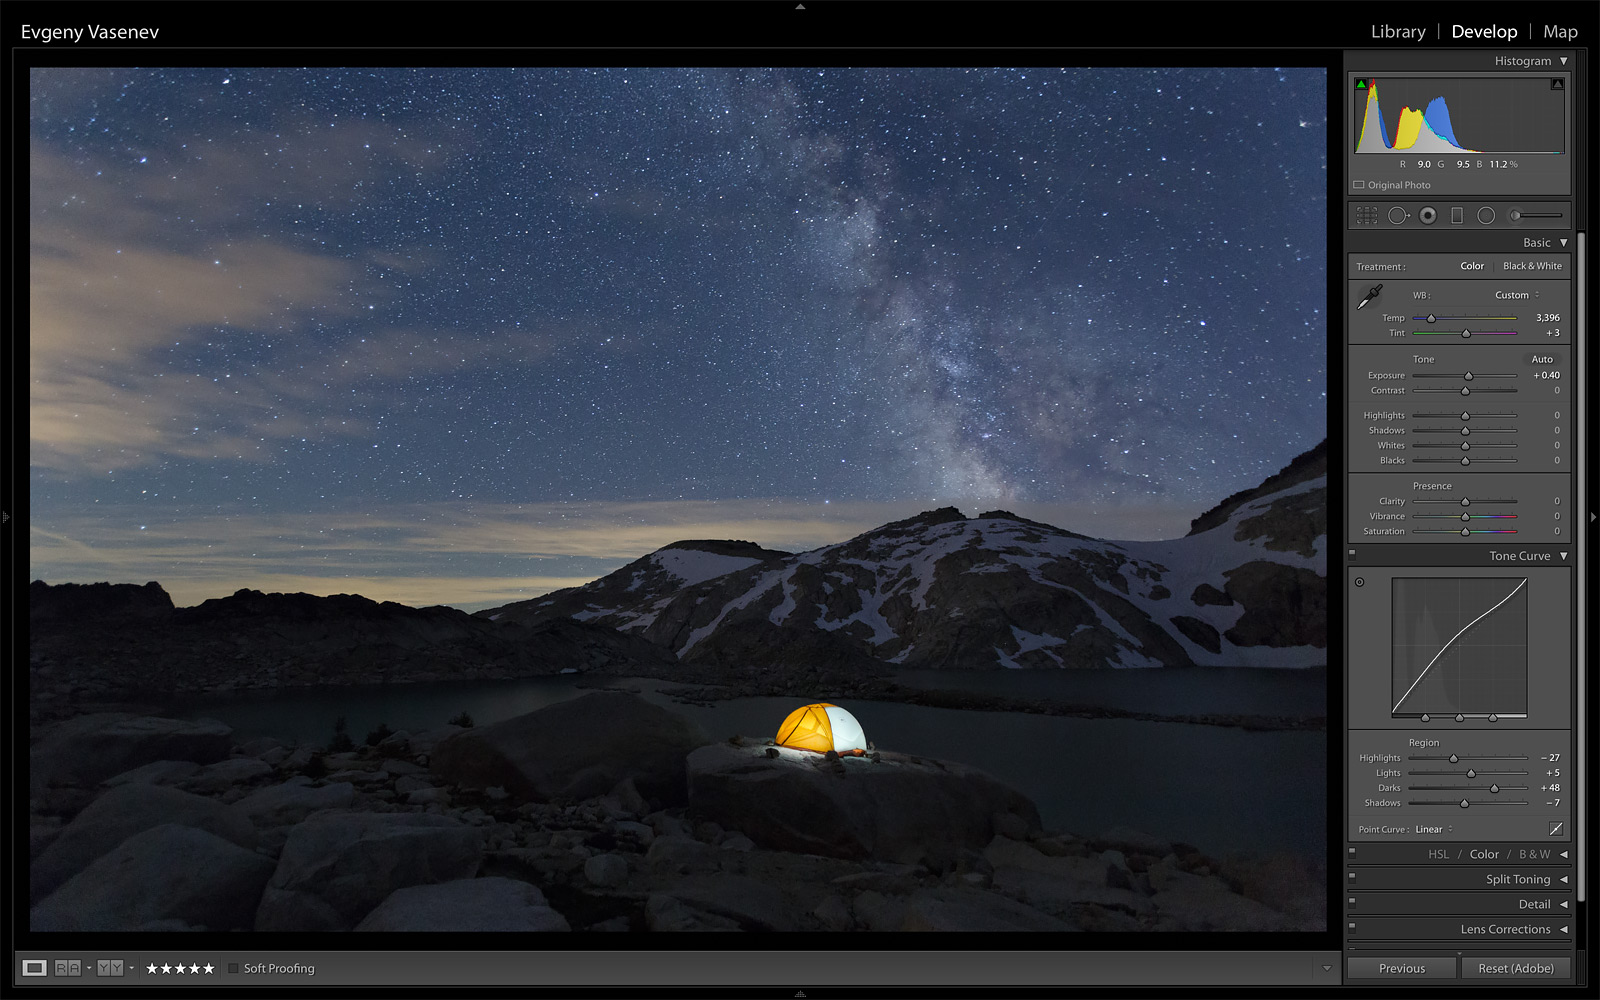
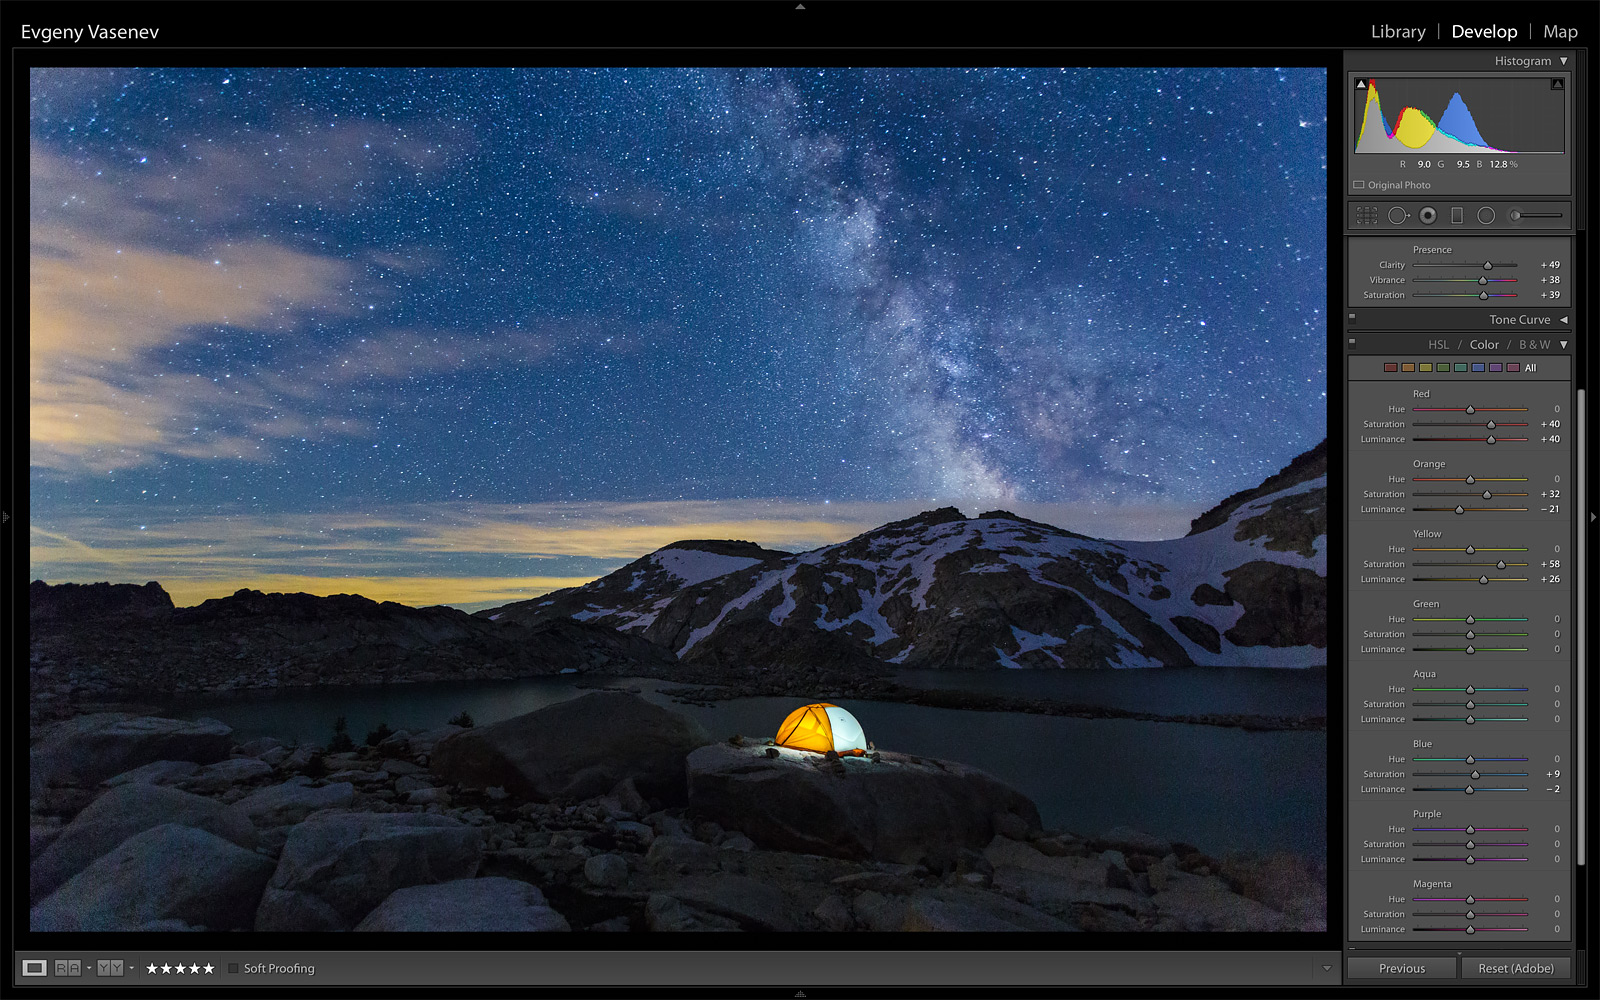
My photo style is colorful and saturated, so I work with colors and presence sliders a lot. I add some saturation, vibrance, and clarity. The next step is adjusting separate colors. I usually work with yellow, orange, red and blue as these colors are in the Milky Way and generally on my main objects.
Then I create radial filers and make local adjustments on the Milky Way and the primary object. Here I play with additional color and tone correction. But as I mentioned before I don’t have any step-by-step processing workflow, and every picture has own unique processing. After that I do some decorative adjustments such vignetting and grain.

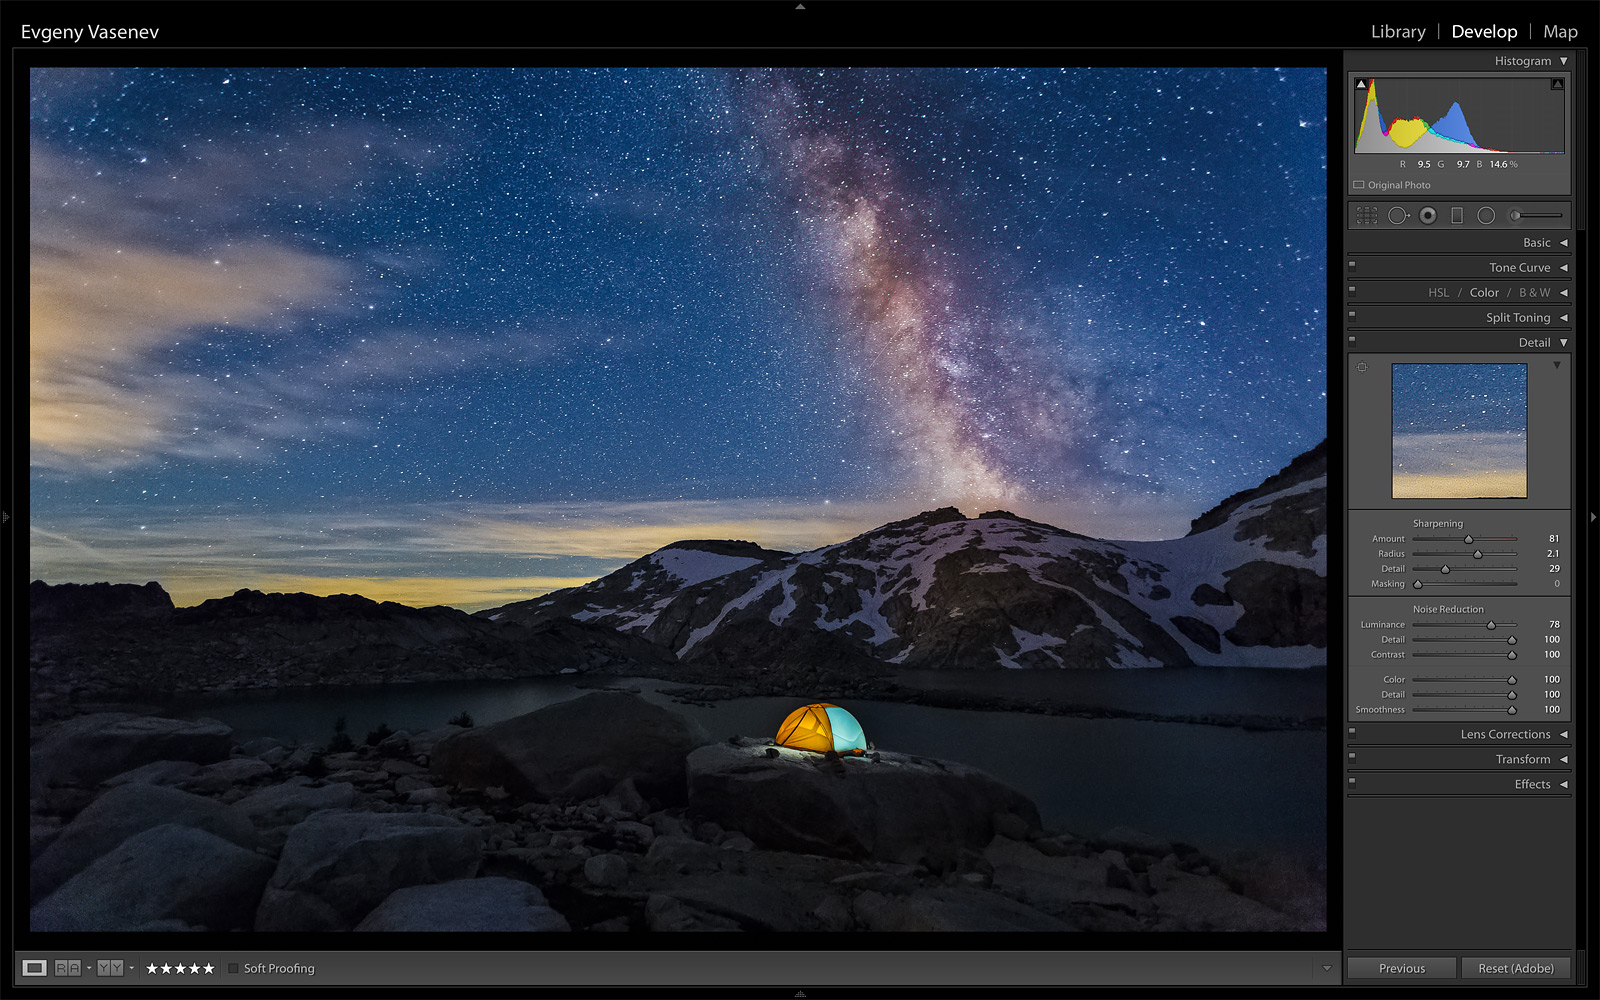
And the last major thing is sharping and noise reducing. Here I spend some time as I said above all night shots have some digital noise, and I am trying to reduce it but don’t lose details.
Conclusion
That’s it! It was the long read, but I hope you got some helpful information. Now you should get some practice and take photos. And I bet every next picture is going to be better and better! Experiment a lot. Paint by light, play with different objects, use different flashlights, shoot the moon, stars, learn more about night shooting techniques. Try to put people in the frame.
I would be happy to help you grow as an adventure photographer, so don’t hesitate and ask me any questions! You can do it right here or just send me an email.
Subscribe to get updates
Subscribe and get 5 HD wallpapers for mobile and desktop devices
Thank you!
Something went wrong 🙁